From the moment you start your business, there are countless tasks you need to complete each and every day. From generating leads and managing the client projects after these leads have become clients to managing your finances & admin, writing content, tracking your metrics, evaluating your services or launching new ones and much more.
Without proper organisation and management, keeping track of deadlines, communicating with clients, determining priorities and planning your week so that you can stay on top of your workload will be challenging.
In your search for getting more organised, you’ve read or heard from other designers that you should work with a creative project management system like ClickUp or a project management system like Dubsado to manage design projects because they make life so much easier. As you desperately need your design studio to be more organised you get all excited and are ready to create your account but soon that excitement is nowhere to be found because you’re not exactly sure what to put into your shiny new creative project management software.
Do you just put your daily to-do’s in ClickUp? Do you use ClickUp for client management? Or Dubsado? Can you not just use either of these for all of your design studio’s tasks?
Any new tool can be exciting, but there’s something particularly exciting about design project management software that promises to make your business run more efficiently. Or that you’ll be more organised. Because creative project management systems can do that for your design studio.
And isn’t that what most creatives need? More structure in the way you run your business.
But if you don’t know in which way a project or client management system is supposed to help you manage design projects and business tasks, how can you make it work for you?
If used right, these creative project management tools are capable of so much more than being a glorified to-do list or for you to send proposals to clients.
So in this blog, we’ll look a the differences between Dubsado and ClickUp and I’ll share some practical examples of things that can be managed in both systems so that you can see the difference. But before I do that I want to make sure this is something you need to be investing your time (and money) in.
Why you might need Dubsado or ClickUp as a designer
If you’re nodding your head while reading any of the below examples (these are obviously just a few of them, there can be many more reasons) it might be time for you to set time aside to start using Dubsado and/or ClickUp for your design studio.
Disorganised client management
I’ve heard several clients say that did not have a project and client management system that they used to ‘just wing’ client projects. I can completely understand that, because how are you supposed to keep track of everything that comes with a design project if you don’t have a central place that gives you an overview of the projects you have and what part of the design process needs to happen in the coming week?
Sure, you can go a long way by using your Google Docs or Sheets with checklists, but if you’re like most of my clients, you are not a fan or don’t have enough knowledge to use spreadsheets. This results in long to-do lists in your notebooks, countless Post-it notes and a huge mental to-do list.
Without a project management system like ClickUp (or Dubsado where you can also automate parts of your projects), it can be challenging to keep track of project deadlines and know which tasks need to be completed by when to keep to the timeline which can result in missed deadlines, incomplete or missed tasks, project delays and inconsistent processes. Which in turn, impacts how happy your clients are.
Inefficient billing and invoicing
This could be part of disorganised client management but I think it is important to mention this separately. Because if you don’t get paid for design work, your business is not sustainable and you are not able to contribute to your family’s expenses.
While you can send invoices from Quickbooks (or similar accounting software), it is a manual process. And what about tracking your invoice due dates and sending emails when an invoice is late? Where would you keep track of this?
When you don’t have a client management system like Dubsado in place, that can support you in (or even automate) the sending of your invoices and send reminders when overdue, this can result in delayed sending of invoices, delayed payments, inaccurate invoicing and lost revenue.
Inefficient Communication
Without a central communication system, it can be challenging to keep track of client requests, feedback, and revisions. While you can manage a lot from your Gmail, it’s not an easy process to send logo designs for feedback and you’ll need Google Forms to send the onboarding questionnaire.
Besides that this is all manual work that could be done quicker with a client management system, you’ll probably find yourself writing the same email again and again as well as writing emails on the fly because you don’t have any templates in place.
This can result in miscommunication because it’s easy to let emotions determine what you’re writing, it leaves clients wondering what the next steps are or what is expected from them.
Lack of back-end organisation
Your design studio’s back-end organisation goes so much beyond just trying to manage the tasks you need to complete for client projects.
You can think about things like tracking your time, planning your days, creating sales targets, managing your business plan and creating content plans and workflows for each type of content. But also your resources like your brand guidelines, contact lists, market research etc.
When you don’t have a project management system like ClickUp as the central place to manage all of these you’ll have trouble prioritising tasks, planning your days efficiently, tracking leads and spending too much time finding files in your cluttered Dropbox folders. This can lead to a lack of focus and productivity, causing you to spend more time on design projects than needed and not know what to work on when you have time to work on your business.
Now you know if it is time to set up Dubsado and/or ClickUp for your design studio let’s look at these 2 pieces of software more closely.
The difference between ClickUp and Dubsado
I often see a lot of confusion with designers when it comes to the difference between a project management system like ClickUp and a client relationship management tool like Dubsado. It is important to understand that client management systems like Dubsado and Honeybook do not have the same capabilities as ClickUp or Asana and the other way around.
While it would be great to have 1 system that can do it all, right now there just isn’t one that does that. While Dubsado might say they have a feature like task management capabilities and ClickUp that they have CRM capabilities these are not the core of these tools. This generally leads to features that are not able to do what we as designers need them to do.
What is Dubsado?
Dubsado (or Honeybook) are there to manage the client-facing steps of delivering your services.
Dubsado is a CRM. This stands for client/customer relationship management program.
On the website, they say ‘Use Dubsado to sign contracts, collect payments, send custom forms, and get your time back with powerful workflows — all in one place.”
What this means in practice is that it is a program that:
- Takes away part of the manual work you are doing over and over again like creating and sending proposals, contracts, invoices and booking consultation calls
- Combines different business tools in one. So you don’t need a program to create invoices, another to create contracts and another to schedule calls. With this, you save time as you don’t have to switch from program to program.
- Because it combines different business tools it helps you to streamline your processes and keep your client projects organised.
How can Dubsado help you in your day day-to-day work as a designer?
Let’s look at an example onboarding workflow for design projects. The italic steps represent what Dubsado can do for you:
- The design client completes the contact form
- Dubsado automatically sends an email thanking the client for their interest, that you will review their information and will come back to them in 24 hours (it’s good to set expectations)
- Dubsado creates a task for you to review the form
- In Dubsado you use one of the email templates to let the client know you would love to schedule a call with them to get to know them and their project better. The email includes a link to the scheduler in Dubsado so that they can book the call on a date and time that works best
- The client books the call
- Dubsado sends the client an email to confirm their call and information on how to reschedule or cancel
- Dubsado sends the client a reminder email (24 hours before) about the meeting
- The initial meeting between you and the client takes place
- In Dubsado you use one of the proposal templates to send the client the proposal and connect a contract and invoice
- The client accepts the proposal, signs the contract and pays the initial invoice
- Dubsado automatically sends a copy of the signed contract to the client
- Dubsado automatically sends a welcome guide with an email to the client with information for getting started
This means that Dubsado can support you with:
- Project Management: Dubsado allows you to manage your projects efficiently. You can create workflows, customise forms, template your contracts and proposals and set up automated emails, which helps you save time and stay organised.
- Client Management: Dubsado provides a platform to manage your client relationships. You can track client inquiries, send proposals, and manage contracts and invoices, which helps you keep everything in one place and avoid missing important deadlines.
- Integrations: You can integrate your Dubsado with your website and Google Calendar, create Zoom links and send transactions to QuickBooks.
Want to learn more about Dubsado and client workflows? Check out these blogs:
- Dubsado for Designers: How to onboard clients
- Dubsado for Designers: How to offboard clients
- Get your Dubsado Account setup sorted
- Why is it so hard to set up your Dubsado
- How to streamline your brand or website design client process
Or take the shortcut with the Step-by-Step Dubsado Setup Guide or the Elevate your client workflow with Dubsado Training which includes 4.5 hours of video recordings from the live workshops held in February 2024, 20 email templates designed specifically for use in Dubsado and the Step-by-Step Dubsado Setup Guide
What is ClickUp?
I know it might be a bit confusing as ClickUp is a PMS which stands for project management system. For a designer, projects relate to client work.
On the website, they say ‘Simplify work and get more done. Plan, track, and manage any type of work with project management that flexes to your team’s needs & See your work, your way. Tackle work from any angle with 20+ real-time views that adapt to your needs. Track tasks on List, update workflows on a Board, drag-and-drop due dates on a Calendar, and so much more.’
What this means in practice is that it is a program that helps you to manage the business-facing side of your design studio (but also works perfectly to organise your personal life).
Just like with Dubsado, ClickUp takes away part of the manual work you are doing over and over again like creating to-do lists from scratch every day to have an overview of what you need to do and it combines different business tools in one. So you don’t need, for example, Apple note/Evernote or Google Docs.
How can ClickUp help you in your day day-to-day work as a designer?
There are so many things I could add here, but to summarise ClickUp can support you with
-
Client Project Management: ClickUp provides a centralised platform for managing all your design projects, tasks like creating a mood board, sketching the initial design and preparing final brand design files, and deadlines. You can create to-do lists, set reminders, and track progress for all your projects in one place, which makes it easier to stay organised and on top of your workload.
-
Business Management: ClickUp is highly customisable and therefore allows you to track your time, plan your days, create sales targets, manage your business plan, create a content plan and have content creation templates for each social media channel. These are just a few of the examples of what you can do as you can also use it as a resource to keep your brand guidelines, contact lists, market research etc.
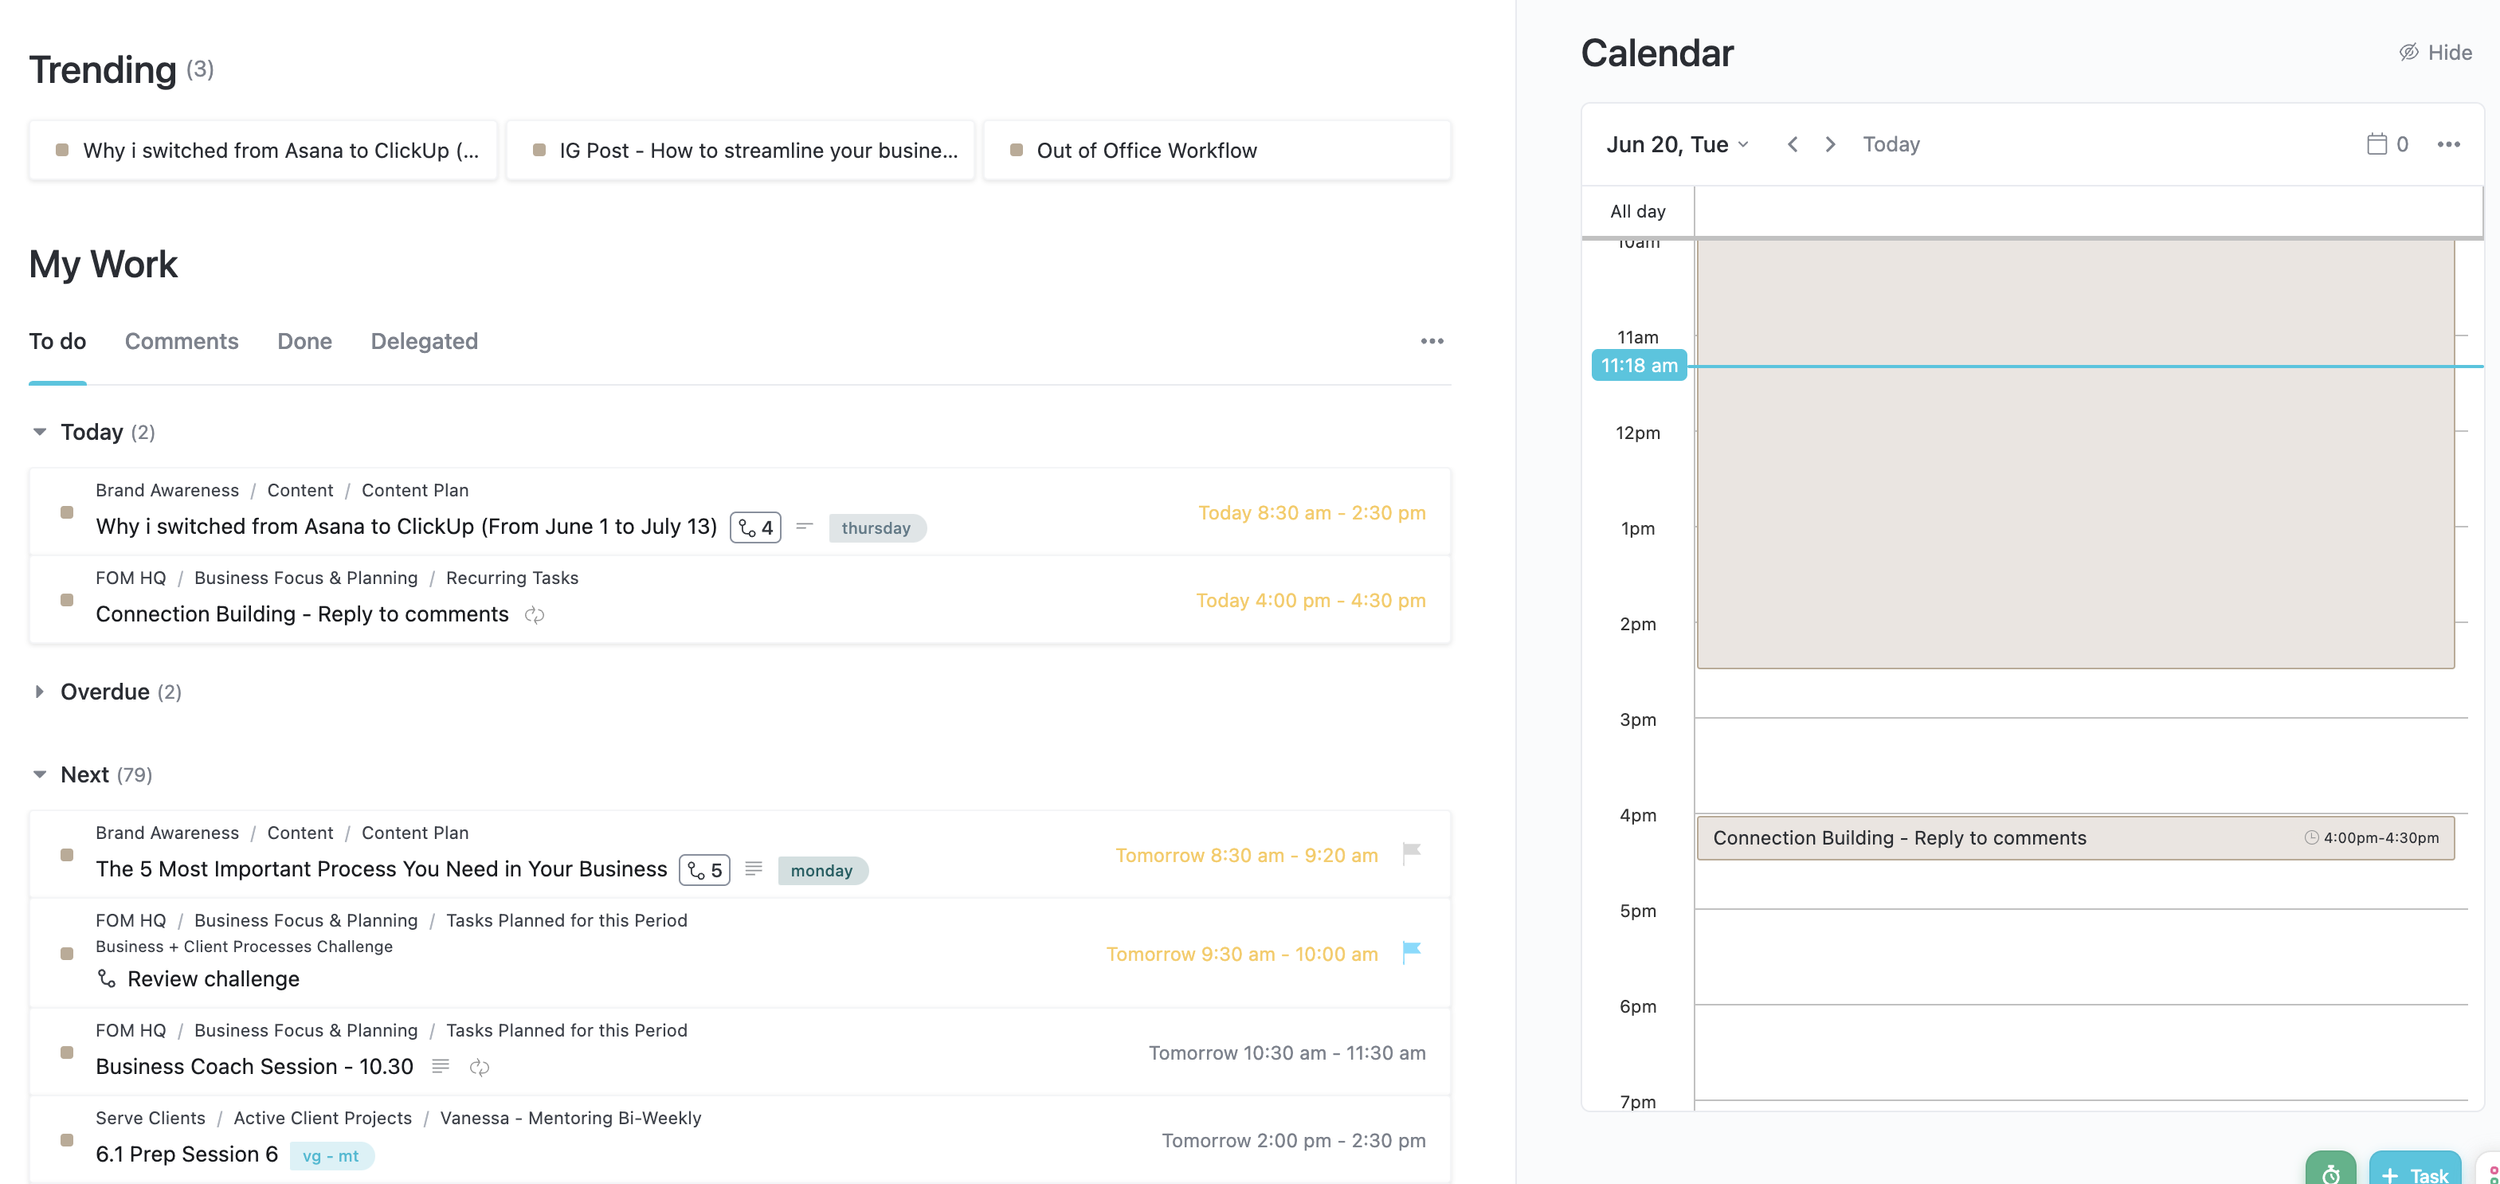
This might make it sound like it will give you a glorified to-do list. And I’ll be honest, their home screen does.
You can see I have 79 tasks at Next, but these 79 tasks have due dates up until September. But when you look at this overview, that’s not what you see. It feels like 79 tasks that are all screaming for your attention.
The solution?
Enter ClickUp’s dashboards! ClickUp’s dashboards have become my daily go-to. They’re where my day begins and ends, giving me a comprehensive overview of the tasks I need to tackle today and what’s coming up in the next few days.
Think of dashboards as a personalised filter for all your tasks. They serve as a centralised hub, eliminating the need to dig through folders and lists to find the most important tasks.
Dashboards offer a single location to access all relevant information, allowing you to stay focused and organised. It’s like having a personal assistant that keeps you organised and focused on what truly matters.
And the best part?
You can customise your dashboard to suit your needs, create graphs, or even display time-tracking overviews.
Check out the example below, showcasing a dashboard designed specifically for task overviews. It includes a checklist to start and finish your day (not showing in the screenshot), the middle widget displays tasks due today, and the right widget shows tasks for the next 7 days.
The widgets are automatically updated when a new day starts or when you make adjustments throughout the day for any tasks that have a due date of today or the next 7 days.
For more insights into what ClickUp can do for you have a look at these articles: How to use ClickUp to track your revenue & how to determine your priorities with ClickUp
I hope this helps you to see the possibilities of both systems. But I know it can be hard to visualise what this might look like especially when I say you need both of them while ClickUp and Dubsado have overlapping features. So let’s look at a few practical examples.
Practical example – Task Management in Dubsado vs ClickUp
Task Management (of an individual project) with Dubsado’s Task Boards
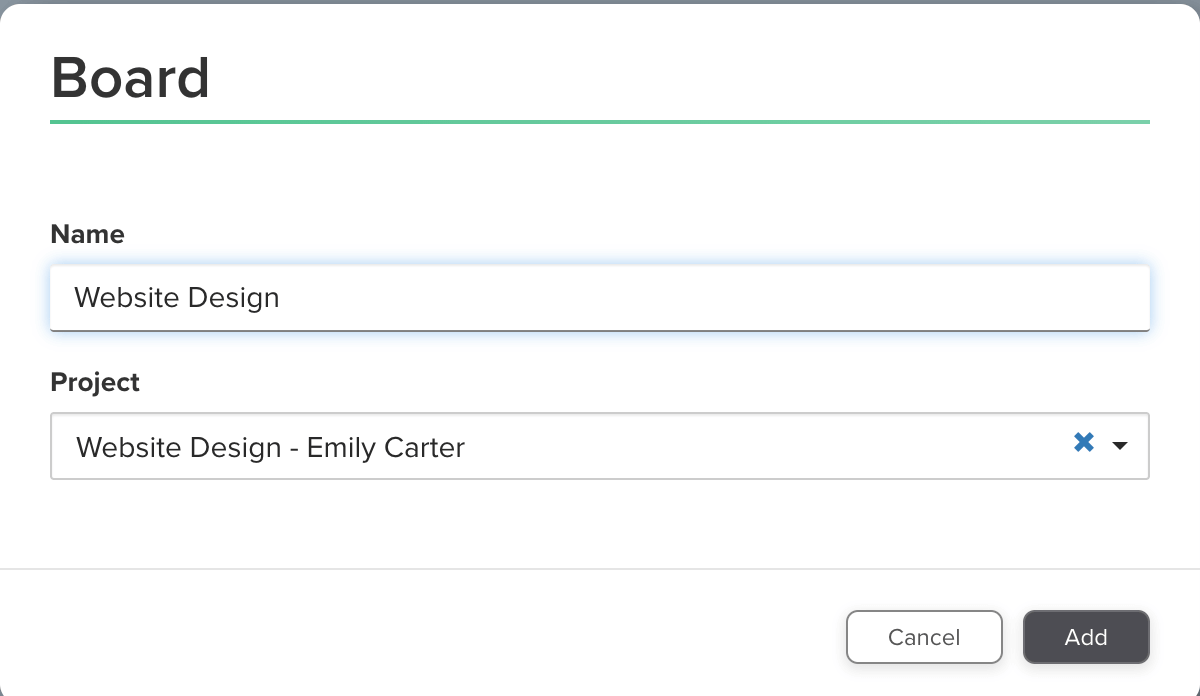
In Dubsado, you can create a task board dedicated to this project for all your manual tasks (Automated tasks will be part of your workflow). When you create one within a client project you won’t be able to copy the board to another project. So the best thing to do is go to Tasks in the left-hand menu (as you can see in the below screenshot), go to task boards (the 3rd tab) and click Add Board.
When you create your boards here as templates you can assign the template board to individual projects.
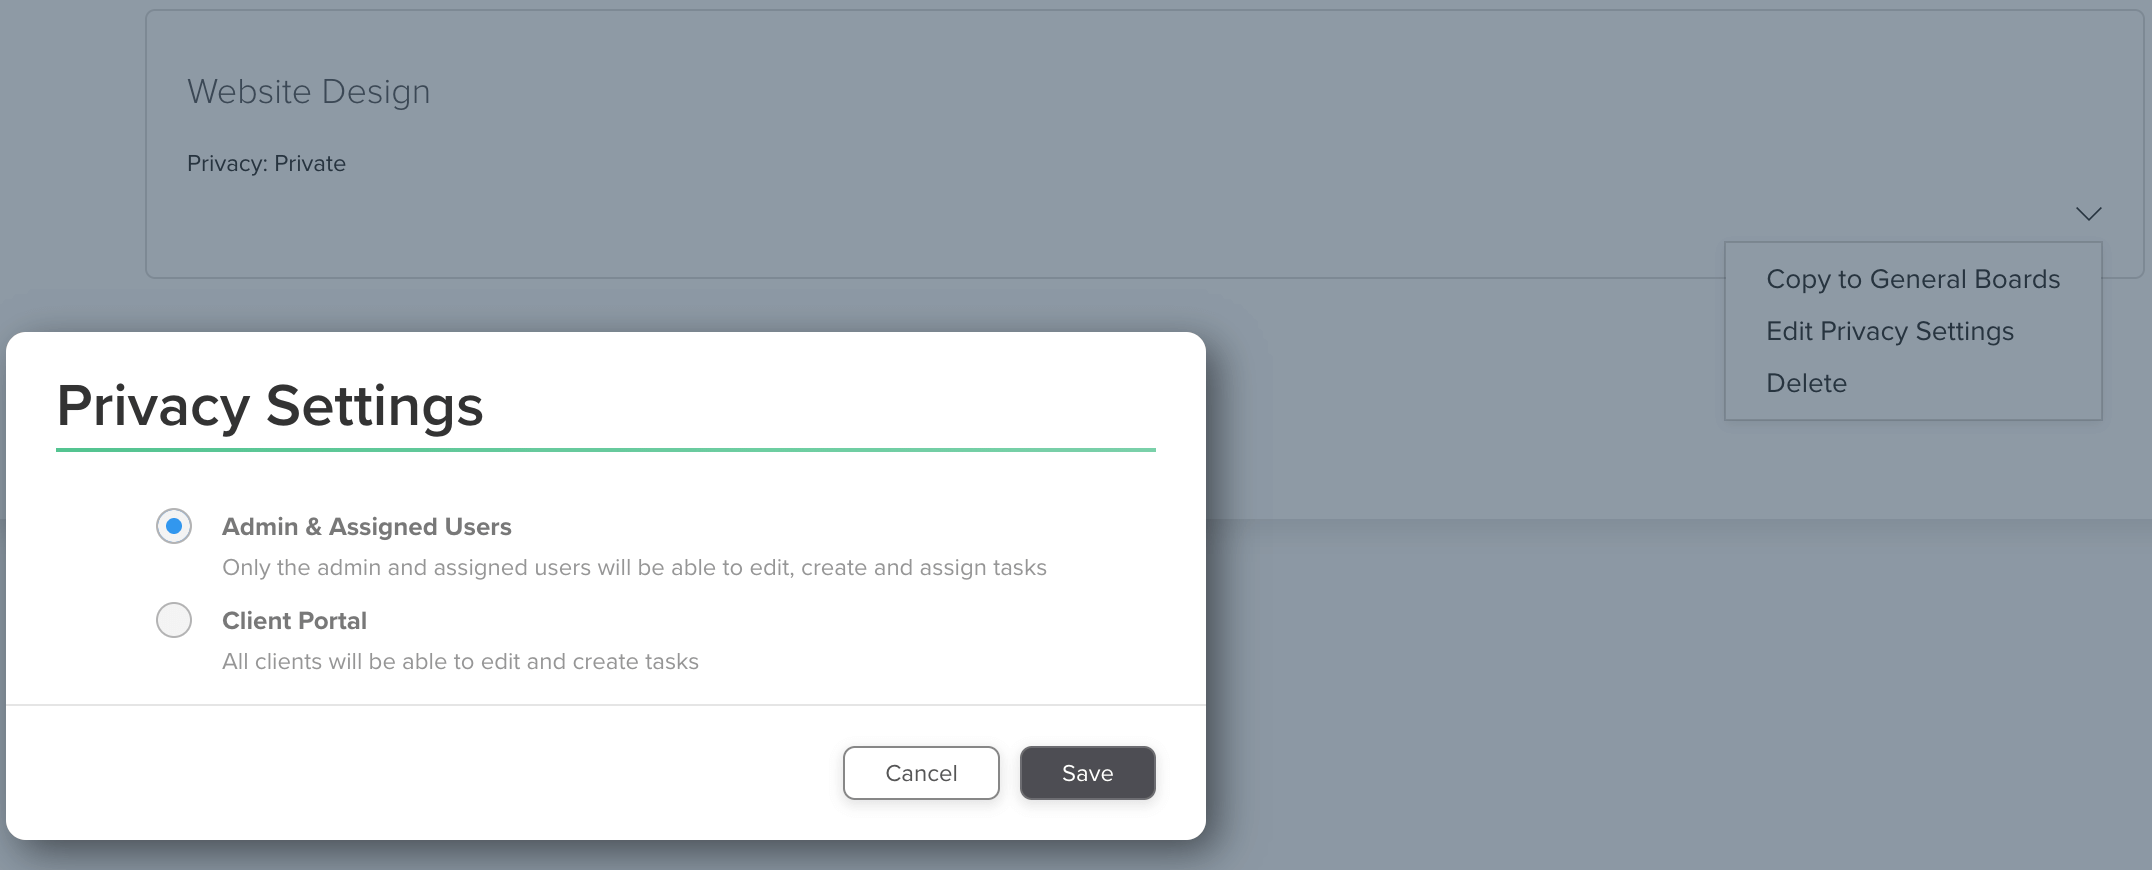
Once you’ve created a new board you can adjust the privacy settings by going into the board and clicking the down arrow on the top right-hand side of the board. You can pick between:
- Admin & assigned users: This is the standard setting. This means that this task board is private and only you and your team can view it.
- Client portal: This means that you’re sharing the board with your clients, which they will able to see in the portal. Important to note is that clients can edit and create tasks as well.
You can adjust the privacy settings of a task board in Dubsado displaying the board only to you and your team members or also sharing it with clients
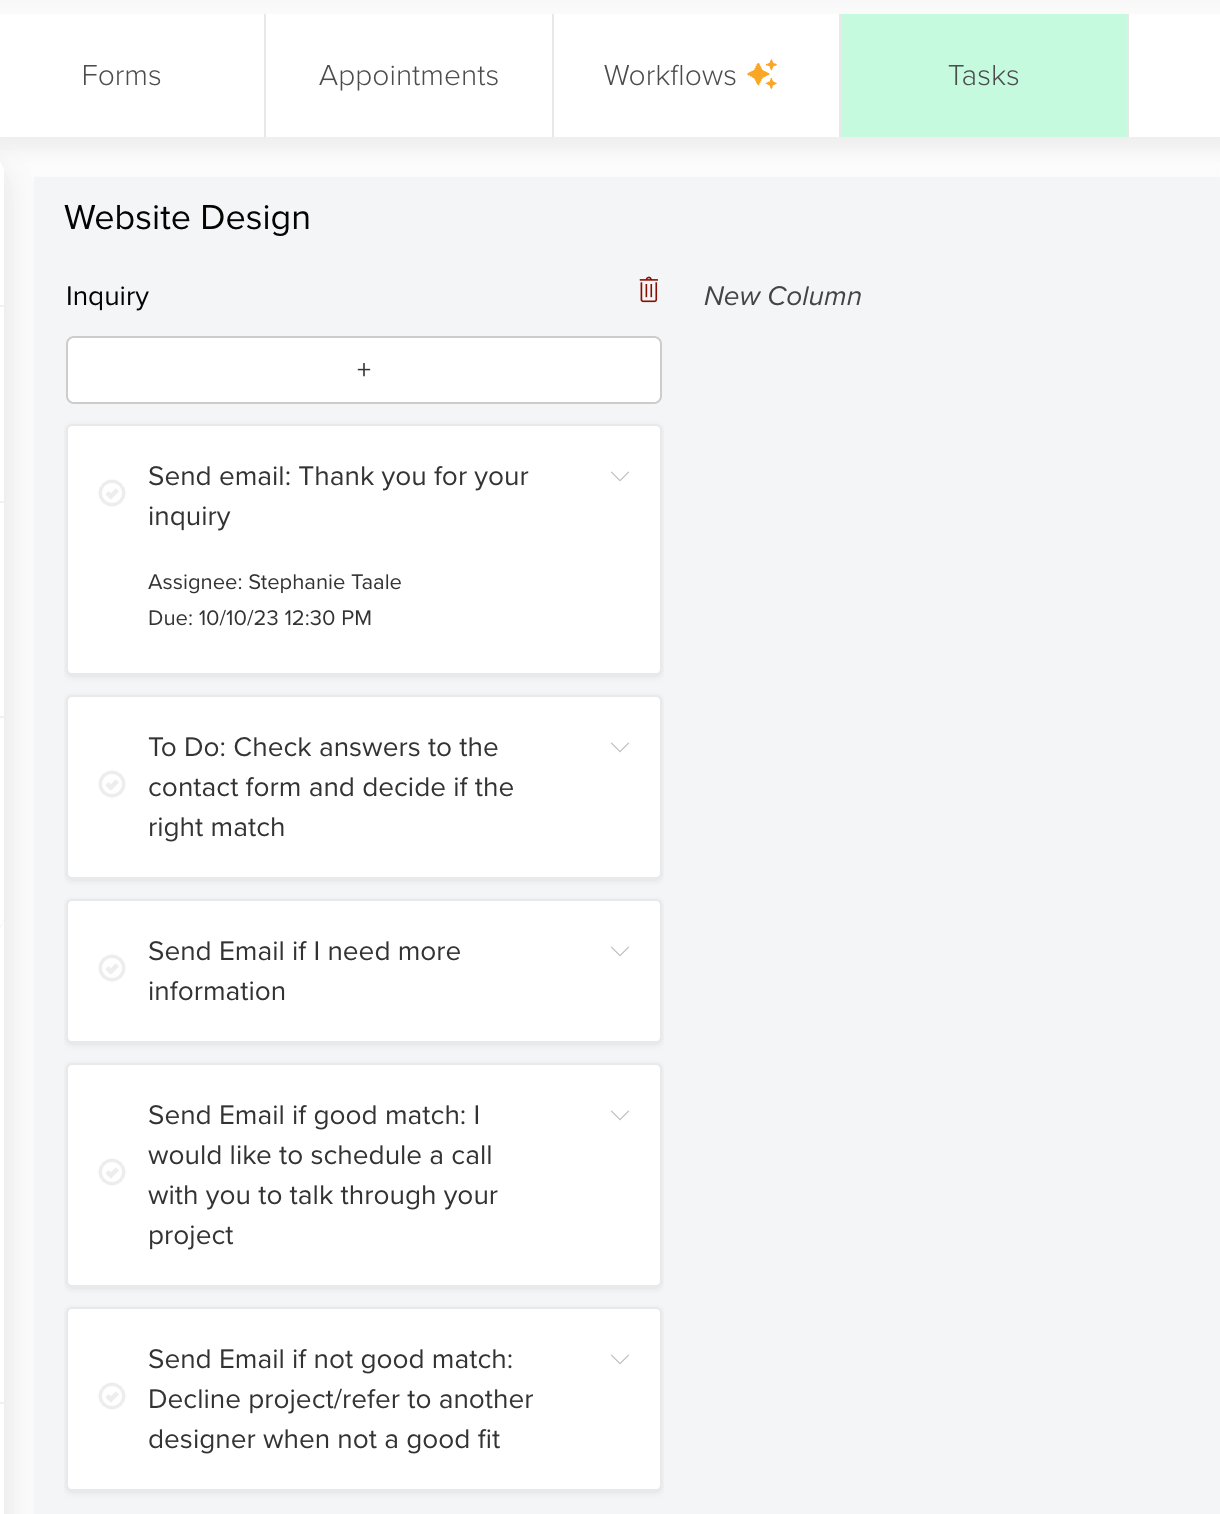
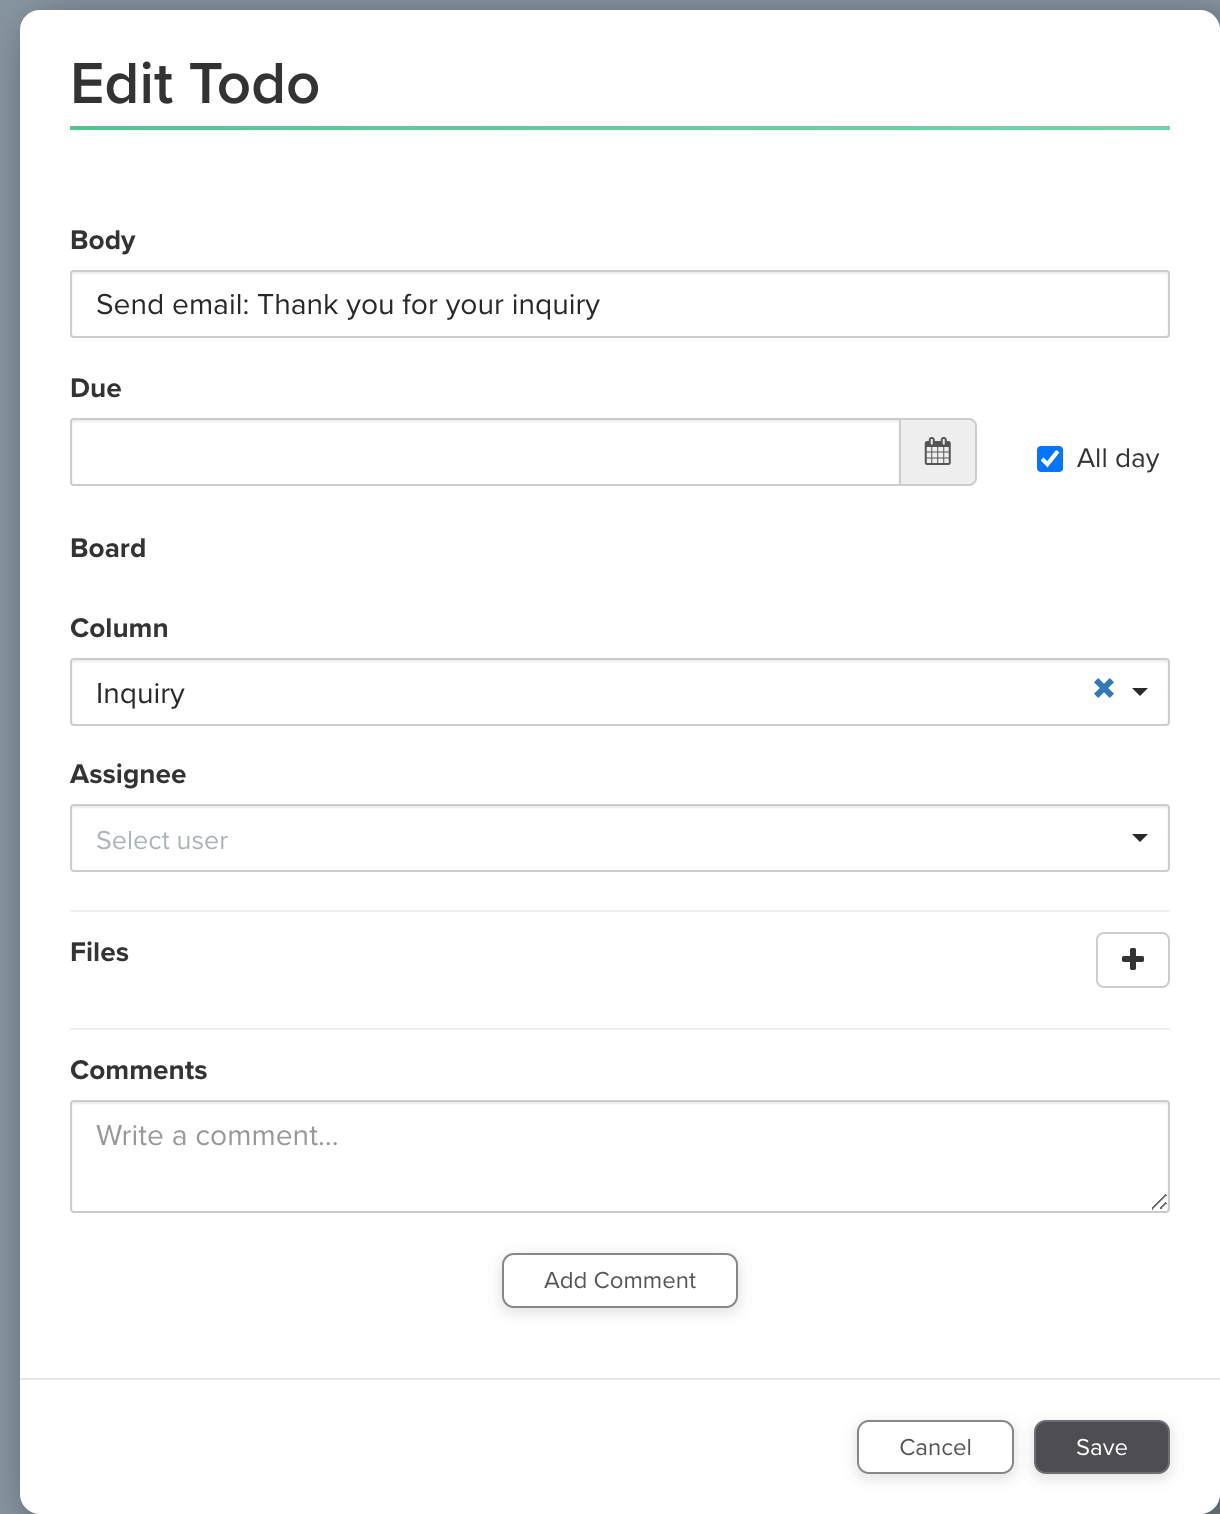
Within the board, you can add columns that represent different phases in your website design project. In the below example, you can see that I have used the inquiry phase and added cards to this column with tasks that are part of the inquiry process.
For each card, you can:
- Add a task name: This is done in the section called body. Try to be as specific as possible and if a task is to large to complete in one go, break it up into smaller subtasks.
- Set Due Dates: Define when each task should be completed. When you set a due date your tasks will also show up in the calendar on your main Dubsado Dashboard.
- Adjust columns: When you want to move a task to a different column you can use the dropdown underneath board -> Column.
- Assign Responsibility: You can assign tasks to yourself and your team members. Only when you assign the task you can see in the task overview on your main Dubsado Dashboard.
- Attach Files: Upload project-related files, such as design sketches or client-provided assets, directly to the task card for easy reference.
- Add Comments: Communicate with your client or team (depending on the privacy settings) by leaving comments on the task card.
Dubsado’s task boards offer a visual way to manage tasks and projects.
Now, let’s compare design project task management in ClickUp
Task Management (of an individual project) with CLickup lists
While manual tasks management is quite straightforward in Dubsado there is a bit of a learning curve when it comes to ClickUp. So I won’t go into how to set this up step-by-step but I will explain what you can see in the below screenshot.
For each task, you can:
-
Add a task name: The task name will display to the left as you can see with DUBSADO – Send Creative Brief
-
Assign Responsibility: You can assign tasks to yourself and your team members.
-
Set Start and Due Dates: Define when each task should start and by when it needs to be completed. You can use a due date without adding a start date but this will allow you to create a visual overview of the project in a Gant view (not displayed here)
-
Time Estimate & Time Tracked: To the right over the screenshot, you will see Time Estimate & Time Tracked where you can add how long you think a certain task will take and track how much time it actually takes. This is very important when you want to understand how you’re spending your time and calculating if your design packages are profitable (are you getting paid for those hours you spend on a project?)
The above-mentioned elements are all part of ClickUp’s standard fields. From here on out all fields you’re seeing have been created by me to manage website design projects.
Phase: You can organise a project by phase as I have done in the image above. You can see by the yellow Focus & Vision tag in the top left-hand (that you also see underneath the phase field) that this project is filtered by design phase.
This design phase field is a dropdown with all the different phases of a website design project. While this is similar to the columns in Dubsado, all you can do in Dubsado is move cards between phases and rearrange the order of columns. In ClickUp there are many more ways you can filter and view your projects.
Timeline (planning): You can for example see the project organised by the timeline (above screenshot) You can see by the pink week 1/4 tag in the top left-hand (that you also see underneath the planning field) that this project is filtered by timeline. This planning phase field is a dropdown with all the weeks (1 to 4) based on the timeline created at the beginning of the project.
Design/Development/Review: These fields are also drop-downs to easily see where you are for each task.
- Design dropdown: Brainstorming, In progress, Final
- Development dropdown: Started, On hold, Done
- Review dropdown: First Review, Second Review, Final Review
Approved?: Once the client approves a section, the tickbox is used to show this.
These fields were enough for me to manage the project. But you can, for example, also add fields like:
- Attach Files: Upload project-related files, such as design sketches or client-provided assets, directly to the task card for easy reference.
- Add Comments: Communicate with your team by leaving comments
- Include a progress bar: That becomes fuller every time you complete a task
- Add notes: There is a large note field that you can add
Task Management (of an individual project) Dubsado vs CLickup
The choice between Dubsado’s task boards and ClickUp for task management depends on your specific needs and preferences as a designer.
Pros and Cons of Dubsado:
- Simplicity: Dubsado offers a straightforward and user-friendly interface. If you prefer a less complex task management system that integrates with your client processes, Dubsado might be the better choice.
- Manual tasks: Dubsado’s task boards are for your manual tasks. If you also use workflows, you’ll have 2 different locations to manage your project.
- Sharing with clients: If you want to share tasks with clients they can edit your tasks.
Pros and Cons of ClickUp:
- Comprehensive overview: ClickUp allows you to create your task list exactly how you want it, giving you a comprehensive overview of all your tasks. As well as several ways to show you the information based on statuses and priorities,
- Templates: Once you have created a task list, you can use it as a template and duplicate it for every client. All you need to do is add the due dates and you’re good to go.
- Sharing with clients: If you want to share tasks with clients you can control what they can and can not do and you can contol what they see.
Practical example – Client Tracker in Dubsado vs ClickUp
Let’s stay with the same example of a website design project
project/client tracker in dubsado
If you click Projects you’ll get to see an overview of all your current projects. Your projects are split up by project status. The default (as you can see in the first screenshot) is based on the statuses:
- Leads: A project is a lead until you have a signed contract or received a payment. This is when you receive an inquiry, book a consultation call, when you’ve sent the proposal and contract or when you’re waiting on payment.
- Jobs: Once the contract is signed or you’ve received a payment a job turns into a project. This could be when you’re onboarding a client, when you’re delivering the service or requesting feedback.
- Combined: This is where you can see all projects regardless of their status.
- Archived: When a project does not go ahead or when you’re finished with a project you can archive it so that it’s not cluttering your overview.
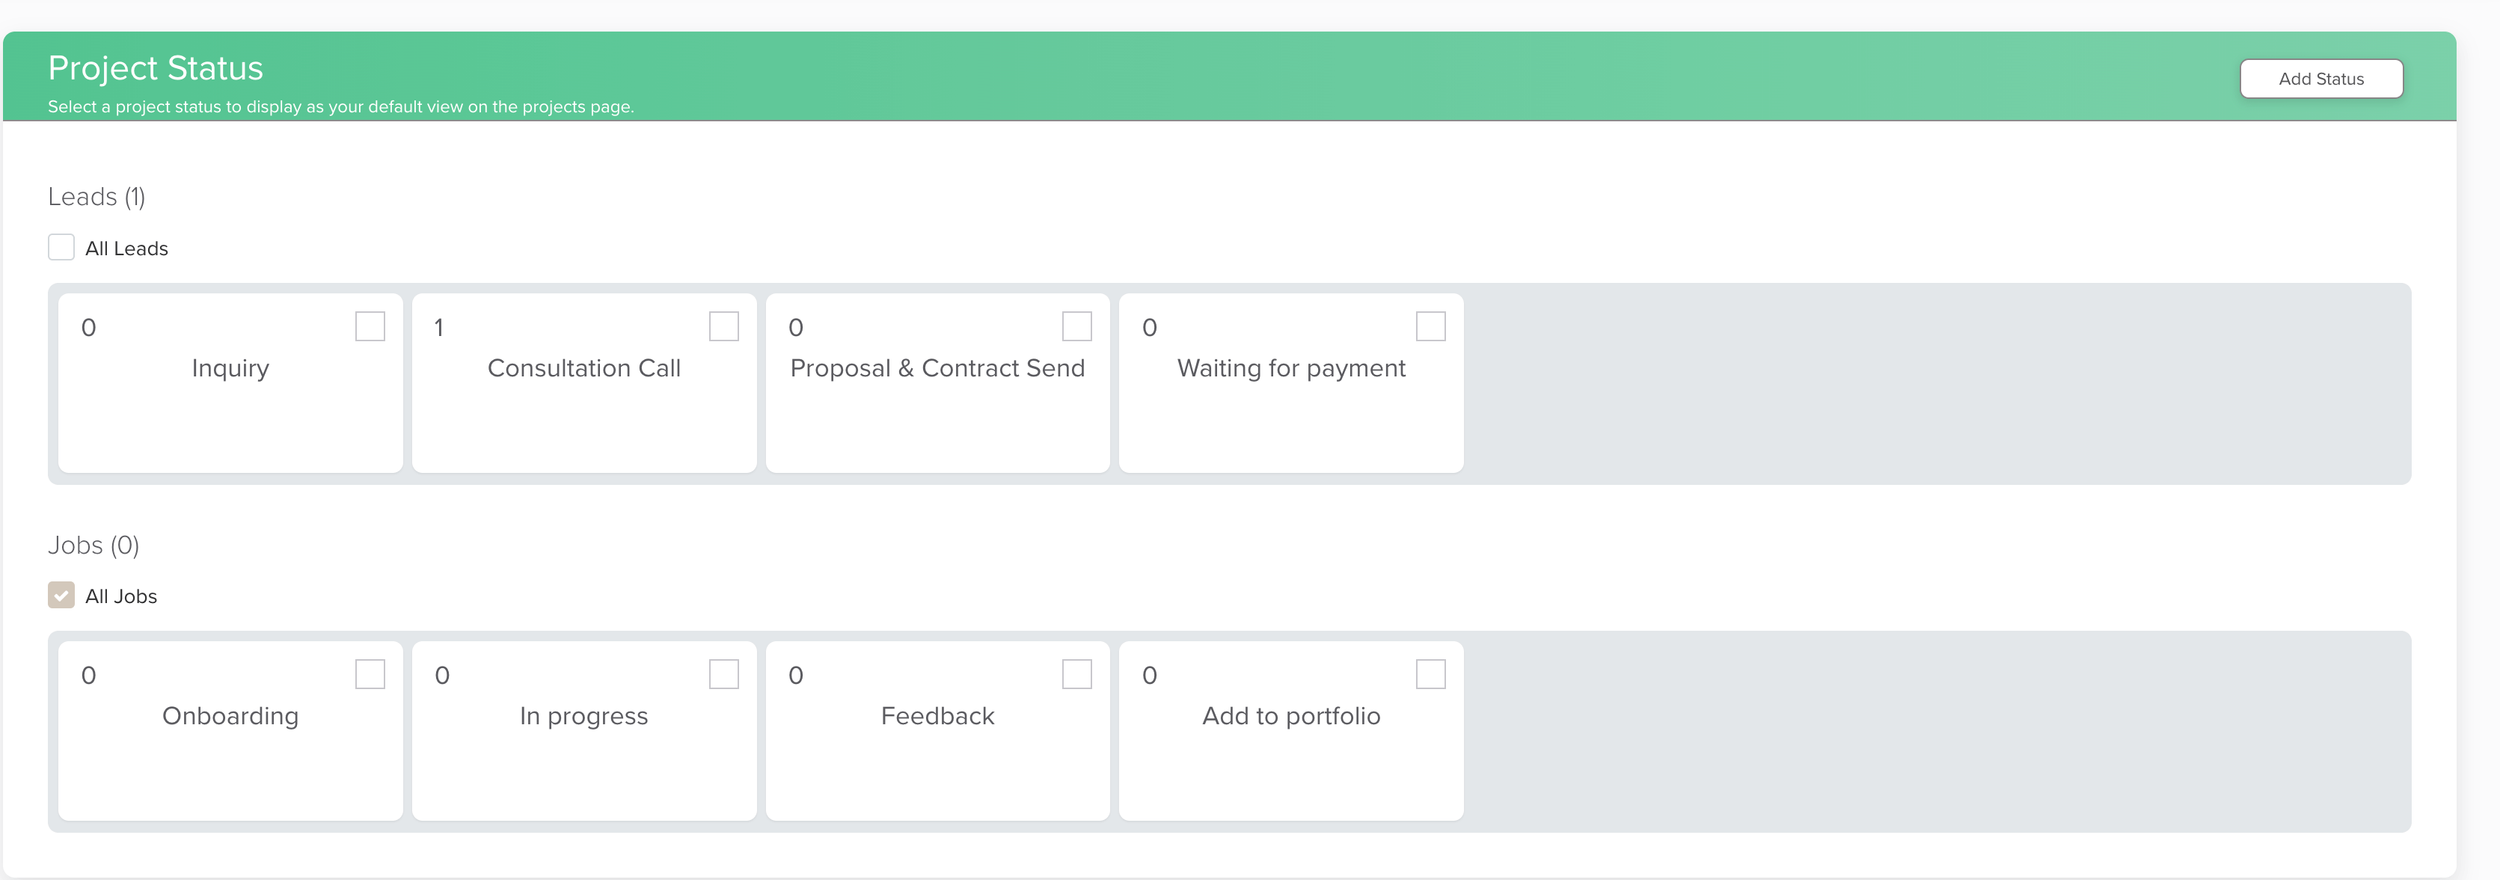
As you’ll most likely have more statuses (project phases) than just leads and jobs, you can personalise this by going to the customise button (top right-hand just above your project overview). When you click this, you’ll get the below screen where you can add statuses by clicking the Add Status button. For each status, you need to assign if it is a Leads or Jobs status.
Once you have personalised your statuses it will look something like in the below screenshot. Important to note is that in the screenshot I have expended both the Leads and Jobs status to display all statuses but these will be collapsed by default and only showing All + 2 statuses.
Every time you go to the project overview Dubsado will only display those projects that are jobs (you can see it light up in green in the first screenshot), so you’ll have to click into the different statuses or go to the combined view to see all projects.
To change this, follow the steps above to go to the customisation screen. In the customisation screenshot, you’ll see a brown tick to the left of all jobs. This means that this is the default view. You can change this to All Leads or any of the individual statuses.
Let’s look at the different sections in Dubsado’s project overview.
- Title: This is the name you give a project. I like to show both the type of service and the name of the client.
- Client: This speaks for itself
- Project Date: Start date of the project
- Invoices: you can see the total invoice for the project. Once a part of the invoice is paid, the progress bar will fill up to display this.
- Contract: Will display if a contract needs sending, is sent or signed.
- Workflow: This will display if a workflow for this project is active, paused or complete
- Status: will display the current status. Here you can also change the status to move it through your design phases.
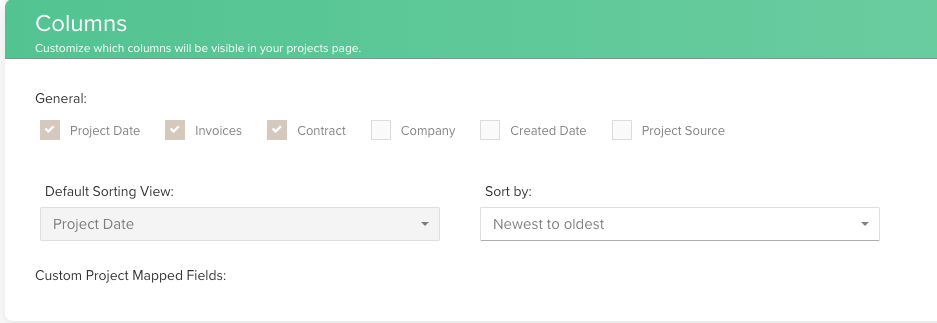
In the same customisation screen as mentioned above you can also adjust which columns you want to see in your project overview. In the below screenshot, you can see all the options.
Now, let’s compare this with a client/project overview in ClickUp
project/client tracker in ClickUp
While the client or project tracker is built into Dubsado, it might not be clear when you would use this in ClickUp. A client tracker (you can use the same setup for a contact list) in ClickUp can be used for keeping track of potential clients before they become a paid clients and need their own list. When we relate this back to the client phases we just set up in Dubsado you can say that this is everything in the lead status where you receive an inquiry, book a consultation call, when you’ve sent the proposal and contract or when you’re waiting on payment.
Just like with the first example, I won’t go into how to set this up step-by-step but I will explain what you can see in the below screenshot.
For each task, you can:
- Task name: The task name will be the client’s first name
- Last name: This speaks for itself
- Assign Responsibility: You can assign tasks to yourself and your team members.
- Due Dates: Define when each task should be completed.
- Time tracked: To the right over the screenshot you will see time tracked. From the moment an inquiry comes in you want to track the time it takes you to complete tasks.
The above-mentioned elements are all part of ClickUp’s standard fields. From here on out all fields you’re seeing have been created by me to manage clients.
- Initial contact date: You want to know how long it takes for a client to become a client. Understanding the timeline for client conversion allows you to set realistic short-term and long-term business goals but will also give you an accurate insight into your financial status. To do this, you’ll need to track the inquiry date.
- Company details: In this example, this is broken up into a text field for the company. name, and a URL field for the email address and website. When you enter links using the URL field they are live links, so you can easily navigate to important resources.
- Service: This field is a drop-down to select which service the potential client is interested in.
- Revenue: This is the budget the potential client has. This is a great question to have on your contact form.
- Client Status: Will display the current status (good to have the same statuses here as in your Dubsado) of the lead using a dropdown. I like to filter this list by client status so that you have a quick overview of all leads in each stage.
- Contact Source: This is another drop-down to easily see the source of business. This can be IG, Facebook, Google, Client Referral etc. The better you know where clients are coming from, the more you’ll be able to direct your marketing efforts.
- Notes: You can add client notes in the description of a task but having a short notes field here allows you to see everything at one glance.
- Files: Upload project-related files, such as your proposal for easy reference.
Task Management (of an individual project) Dubsado vs CLickup
When you use Dubsado you will have the project board, but the question is if this board will give you all the information you need to gauge where projects are and what needs to happen next.
Pros and Cons of Dubsado:
- Done-for-you: Dubsado creates the project board automatically. Besides adding your statuses and deciding which elements you want to see, there is nothing you need to do to create this overview.
- Limited Overview: While you can pick what you want to see, the statuses will collapse and you’ll need more clicks for the full picture. You’ll also need to click on each project to find more details and see what tasks need to happen next.
Pros and Cons of ClickUp:
- Comprehensive overview: ClickUp allows you to create your list exactly how you want it, giving you a comprehensive overview of all your leads.
- Manual work: While ClickUp integrates with Dubsado (more on that below) you will need to enter some date manually. Automations can help you to manage which tasks need to happen as a potential client walks through the lead statuses but you still need to manually change the status for each client.
Does ClickUp integrate with Dubsado?
You can integrate both systems with the help of tools like Zapier and Make. These allow you to “glue” 2 software systems together when they don’t have a native integration.
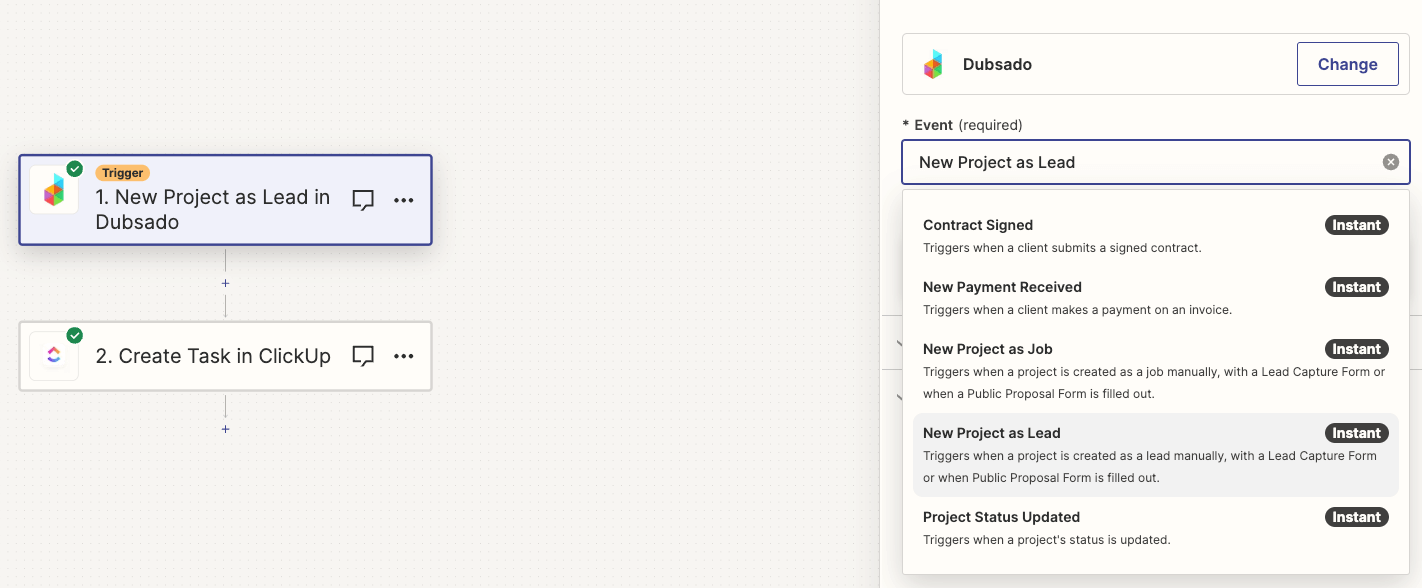
When you use Zapier you can set up triggers (a trigger in an action that needs to happen before information is sent from Dubsado to Zapier)
Dubsado Triggers
- New Lead
- New Payment Received
- New Job
- Contract Signed
- Updated Project Status
Which triggers are available in Zapier to connect Dubsado with ClickUp
Once you’ve selected the trigger, you also need to select the action that needs to happen in ClickUp. Below is an overview of available actions:
- Create Folder
- Create List
- Create Subtask
- Create Task
- New Checklist
- Post a Task Comment
- Post Attachment
- Time Tracked
- Update Task.
One of the integrations that I use is the trigger: ‘new project as lead in Dubsado’ leads to action: ‘Create Task in ClickUp’. What this means is that when a lead books a free mentor session or fills in the contact form, a new task is created in the client overview I showed above. It automatically adds me as the assignee and the date of today as the due date so that I can check the new lead. Because I work with dashboards as explained earlier, the task shows up there as well so I won’t miss it.
As you can see from the actions and triggers there are many more options to integrate ClickUp with Dubsado.
When should you start with setting up ClickUp and Dubsado?
A comment I hear regularly is, I don’t have a lot of client projects going on at the same time so I don’t think I need Dubsado or ClickUp.
I would like to challenge this.
I believe the best thing you can do for your business back-end when you don’t have a lot of clients simultaneously is to spend time setting up your back-end processes so that you have enough time to test and adjust them before things get busy.
Most of my clients have been in business for years but have always struggled with mapping out workflows and setting up systems because they are creatives and this type of work does not come naturally to them. But they have worked with countless clients and walked them through their processes, they just were not as efficient as they could have been would they have had a system like Dubsado or ClickUp to help them manage both the client-facing side of design projects as well as the internal project management.
And I am not saying setting up systems like Dubsado and ClickUp should be the ONLY thing you focus on if you are still in the phase in your business where you need to take on every client you can get. The system projects take a lot of time and while you might feel like you’re productive, you are working on the back end of your business.
This is a mistake I made countless times because systems and processes are where I feel most comfortable just focusing on the back-end work. But none of this work is visible to the outside world. And while well-thought-out contact forms help you to qualify clients and thoughtfully laid out proposals convert leads into clients, when no one even knows you exist there will be no potential clients to fill out your contact forms.
Because I hear this so often I wrote a blog about why I think you should set up your system even when you don’t have a lot of clients yet. You can read about that here
Should you start with Dubsado or ClickUp first?
This is a hard question to answer as I don’t think there is one answer for everyone. As a brand or website designer, the choice between starting with Dubsado or ClickUp will depend on your specific needs and how much you are able to invest.
The 2 scenarios I’ve seen mostly with my clients is that they:
- Don’t have any client or project management system
- They have Dubsado/Honeybook but no project management system
When you don’t have any client or project management system I would advise you to start with setting up your ClickUp. The monthly investment is much lower and you’ll be able to organise your business tasks as well as large parts of your client management with just this one system. But you’ll need alternative tools or documents to send proposals, contracts, invoices etc.
But what I often see with the clients who don’t have these systems in place is that they also don’t send proposals (only quotes per email) and contracts. Therefore it would be helpful to first set up a full client workflow and test this out and manage from ClickUp instead of building this out in Dubsado with all the assets and emails that come with it. Then, when your budget allows, add Dubsado to make your client processes quicker.
When you do have Dubsado but no project management system, then my suggestion would be to focus on optimising your setup because the monthly expense is too high not to use it to its full extent and then, when your budget allows, add ClickUp to manage the business side of your design studio.
I feel this is the most difficult situation to be in, as most clients don’t use Dubsado to the full extent and start to bypass the system and still send out emails on the fly or use Google Forms to send out questionnaires. But then also don’t have a tool like ClickUp to manage all the daily tasks or just to have one central place to keep all your notes, docs and resources.
There you have it…
So there you have it! I hope those examples have given you a clearer picture of the difference between ClickUp and Dubsado and also how these 2 can work together.

